Tuesday, November 2, 2010

Spiced Pumpkin Cupcakes

Happy Halloween!!

/>

So I am happy to announce that these cupcakes turned out perfectly!! After the too "cake-y" Amaretto cupcakes I was a tad bit bummed out. These delightful pumpkin cupcakes totally cured that! And it's all thanks to Annie's Eats again!

I always believed that I was not a pumpkin fan, but these completely override that. I love them!


Here is the recipe, and as always Happy Baking!

Spiced Pumpkin Cupcakes
from Annie's Eats

Yield: about 24-30 cupcakes
Ingredients:
For the cupcakes:
2 2/3 cups all-purpose flour
2 tsp. baking soda
2 tsp. baking powder
2 tsp. ground cinnamon
¼ tsp. freshly grated nutmeg
¼ tsp. ground cloves
1 tsp. salt
1 (15 oz.) can pumpkin puree
1 cup sugar
1 cup packed light brown sugar
1 cup canola or vegetable oil
4 large eggs

For the frosting:
8 oz. cream cheese
5 tbsp. unsalted butter, at room temperature
2 tsp. vanilla extract (I prefer clear)
2½ cups confectioners’ sugar, sifted

Directions:
To make the cupcakes, preheat the oven to 350°F.
Line cupcake pans with paper liners.
In a medium bowl, sift together the flour, baking soda, baking powder, cinnamon, nutmeg, cloves and salt.
Set aside. In the bowl of an electric mixer, blend together the pumpkin, granulated sugar, brown sugar and oil.
Add the eggs one at a time, beating well after each addition.
With the mixture on low speed, add the flour mixture in two additions, mixing just until incorporated.

Fill the cupcake liners about three-quarters full.
Bake until the cupcakes are golden and a toothpick inserted into the center comes out clean, 18-20 minutes.
Transfer the pans to a wire rack and let cool for 10 minutes, then remove the cupcakes from the pans and let cool completely.

To make the frosting, combine the cream cheese and butter in the bowl of an electric mixer.
Beat on medium-high speed until well combined and smooth, about 2-3 minutes.
Mix in the vanilla extract.
Gradually beat in the confectioners’ sugar until totally incorporated, increase the speed and then beat until smooth.
Frost cooled cupcakes as desired.


I decorated these with candy corn pumpkins and used these adorable halloween themed cupcake papers (that I bought back in September! lol!).


I added a little something extra to the cake batter (something I learned from Grace, the cake specialist I have been interning with), but I am keeping it a secret! ;)

What did you all do for Halloween and what did you dress up as?? I dressed as my hero Tina Fey!!

Saturday, October 30, 2010

Wild Amaretto Cupcakes


Okay, so I have to say these by far are my least favorite that I have ever made. Sad, I know. I got the recipe from Primrose Bakery's cookbook. This is another England based bakery and I am starting to think they like their cake, well, really cake-y. So, eventhough I am not entirely happy with how they turned out, I will still post the recipe and wish you the best! The recipe calls for two different kinds of flour, but I recommend only using all-purpose flour. Normal vanilla cupcake recipes that yield for 12 like this recipe only call for about 1 and 1/2 cups of all-purpose flour, so you can play around with it. If I made these again I would not use the self-rising flour and put only 1 and 1/2 cups of all-purpose. The frosting is pretty sweet, but it upheld better than any frosting I have ever made. Plus, the cake lady I have been working with (which I will get to in another post) said the frosting was good!

Here is the recipe...Happy baking!

Amaretto Cupcakes
Recipe from: "Cupcakes from the Primrose Bakery"

Yield: 12 cupcakes

Ingredients:
8 tablespoons unsalted butter, at room temperature
3/4 cup plus 2 tablespoons granulated sugar
2 large eggs
3/4 cup plus 2 tablespoons self-rising flour
3/4 cup plus 1 tablespoon all-purpose flour
1/2 cup 2% reduced fat milk, at room temperature
1/2 teaspoon Amaretto liqueur or almond extract

For the syrup:
2/3 cup granulated sugar
1/2 cup water
1/2 teaspoon Amaretto liqueur or Almond extract

Directions:
Preheat the oven to 350 degrees and line a 12-cup muffin pan with cupcake liners

In a large mixing bowl cream the butter and sugar until the mixture is pale and smooth, which should take 3 to 5 minutes using an electric hand mixer. Add the eggs, one at a time, mixing for a few minutes after each addition.

Sift the two flours together into a seperate bowl. Mix the milk and the Amaretto together. Add one-third of the flours to the creamed mixture and beat well. Pour in one-third of the milk and beat again. Repeat these steps until all the flour and milk have been added.

Carefully spoon the mixture into the cups, filling them about two-thirds full. Bake in the oven for about 25 minutes until slightly raised and golden brown. To check they are cooked, insert a wooden skewer in the center of one of the cupcakes -it should come out clean.

Meanwhile, combine the ingredients for the syrup in a microwave safe bowl and microwave on high until sugar melts completely (about 1 1/2 minutes); stir to combine. Alternatively heat over a low heat in a saucepan.

Remove cupcakes from the oven and leave in the pan for about 10 minutes before carefully placing on a wire rack. While they are still warm, dip the tops of the cupcakes into the syrup for a couple of seconds. Return to the wire rack to cool completely.


For the frosting:

Ingredients:
8 tablespoons unsalted butter, at room temperature
1/4 cup 2% reduced fat milk, at room temperature
1 teaspoon pure vanilla extract
4 3/4 cup confectioners' sugar, sifted
1/4 teaspoon Amaretto liqueur or almond extract (add a little more depending on taste)

Directions:
In a large mixing bowl beat the butter, milk, vanilla extract, and half the confectioners' sugar until smooth - this will take a few minutes using an electric hand mixer. Gradually add the remainder of the confectioners' sugar to produce a buttercream of a creamy and smooth consistency.

Add the Amaretto and beat well. Taste the frosting and decide if you want to add more Amaretto.

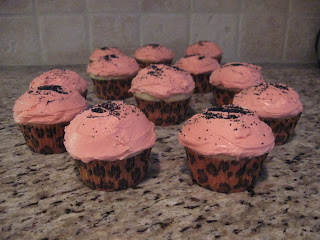
Frost cupcakes! You can decorate with slivered almonds. (or make them wild like I did with animal print cupcake liners, bright pink frosting, and black sugar sprinkles!!)


Tuesday, September 14, 2010

Banana Espresso Chocolate Chip Muffins


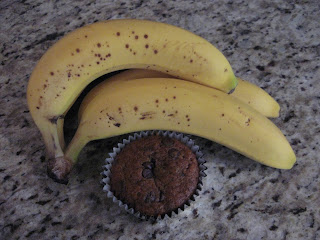
Old, mushy, brown bananas? Don't get mad, get glad! Make something with them! Banana bread is delicious, but I wanted something different so I went back to Annie's blog: Annie's Eats and found this inticing recipe---Banana Espresso Chocolate Chip Muffins!

I got my old bananas from work! They were headed for the trash, so I saved them and went on a search for something yummy! I could've made cupcakes, but since I am making another batch of cookies n cream cupcakes later in the week I decided to do muffins! Don't worry Starbucks Seacliff you will reap the rewards of these treats...Thanks for providing the main ingredient!!

Banana Espresso Chocolate Chip Muffins:
(From Annie's Eats)

Yield: 12 muffins

Ingredients:
1 1/2 cups all-purpose flour
1/2-1 tsp. espresso powder (depending on your taste)
1 1/2 tsp. baking soda
1/2 tsp. salt
1 1/2 cups very ripe bananas, mashed
1/2 cup granulated sugar
1/2 cup light brown sugar, firmly packed
8 tbsp. unsalted butter, melted
1/4 cup milk
1 large egg
1/3 cup mascarpone cheese, at room temperature
1 cup dark or semisweet chocolate chips

Directions:
Preheat the oven to 350 degrees F. Line a 12-cup muffin pan with paper liners. In a small mixing bowl, combine the flour, espresso powder, baking soda and salt. Stir together and set aside. In the bowl of an electric mixer combine the mashed bananas, sugar, brown sugar, butter, milk, egg and mascarpone. Mix on medium speed until well combined. Add the dry ingredients to the wet ingredients and mix on low speed just until incorporated. Gently fold in the chocolate chips with a rubber spatula.

Divide the batter evenly between the prepared muffin cups. Bake for 20-25 minutes or until a toothpick inserted in the center comes out clean. Let cool in the pan for 10 minutes, then transfer the muffins to a wire rack and allow to cool completely.


Some notes:
It calls for espresso powder but I used Starbucks VIA Italian Roast thinking there would not be a huge difference in flavor, but I can't taste the coffee flavor at all. Annie said she had this problem with hers as well and she used espresso powder, but if you want to taste it then I suggest: more of whatever coffee powder you use!

I used mini chocolate chips which gives you more chocolate, but I guess according to the recipe you can use regular sized chocolate chips, so you decide!

Finally, mascarpone cheese! A sweet Italian soft cheese that I have heard can be used in baking instead of butter?! I might try it! If you can't find mascarpone cheese at your grocery store you can use cream cheese!

Enjoy these, I hope yours have a little more coffee flavor, but either way you can't go wrong with banana and chocolate!!

Until next time,
Perna Cakes

Saturday, September 4, 2010

Nutella Cupcakes!


I have a bit of a love affair with Nutella! How could you not love this chocolaty-hazelnutty goodness?! So needless to say when I saw a recipe for Hazelnut and Chocolate cupcakes in a cookbook my Mom gave me I knew right then and there what my next baking expedition would be!

Speaking of my Mom, she will be in town tomorrow afternoon and will finally be able to try so of the cupcakes I have been talking so much about!

First I want to give you the recipe and then I can talk to you about some tricks that might save you some time on these bad boys!!


Hazelnut and Chocolate Cupcakes (NUTELLA!!)
(recipe from The Hummingbird Bakery Cookbook)

Ingredients:
3/4 cup plus 1 tbsp. all-purpose flour
2 1/2 tbsp. unsweetened cocoa powder
a scant 3/4 cup sugar
1 1/2 tsp. baking powder
a pinch of salt
3 tbsp. butter, at room temp.
1/2 cup whole milk
1 egg
1/2 cup Nutella
about 36 whole, shelled hazelnuts, to decorate

Preheat the oven to 325 degrees

Put the flour, cocoa, sugar, baking powder, salt, and butter in a bowl and beat on slow speed until you get a sandy consistency and everything is combined.

Slowly pour the milk into the flour mixture, beating well until all the ingredients are well mixed. Add the egg and beat well. (Scraping any unmixed ingredients from the side of the bowl with a rubber spatula).

Spoon the batter into the paper cases until two-thirds full and bake in the preheated oven for about 20 minutes, or until the cake bounces back when touched.

When the cupcakes are cold, hollow out a small section in the center of each one and fill with a dollop of Nutella.

Frosting:
2 cups confectioners sugar, sifted
5 tbsp. unsalted butter, at room temp.
2 tbsp. whole milk
1/3 cup Nutella

Beat the confectioners sugar and butter together in a bowl on medium-slow speed until the mixture comes together and is well mixed.

Turn the mixer to a slower speed. Slowly pour in the milk, then when it is all incorporated, turn the mixer up to a high speed.

Continue beating until the frosting is light and fluffy, at least 5 minutes. The longer the frosting is beaten, the fluffier and lighter is becomes.

Stir in the Nutella by hand until evenly mixed into the frosting. When the cupcakes are cold, spoon the frosting on top and finish with about 3 hazelnuts per cupcake.

YIELD: This recipe is for 12 cupcakes only!! I doubled the recipe!!


Alright! Like I said above, the recipe straight from the book and the one I copied to my blog is only for 12 cupcakes! I doubled to make 24 cupcakes! I also doubled the frosting recipe which I do not recommend unless you are making jumbo cupcakes! I have so much leftover that I can make 12 more and still have enough! The great thing about frosting is that it is so easy to make! If you need a little more then make a little more by cutting the frosting recipe in half!

To hollow out a section in the center, I used a little trick of the trade that I got from watching Cupcake Wars on Food Network, a corer, much like this one:

The key is to twist in and then lift! I am not gonna lie, it is not particularly easy to do and what's a little trickier is putting the Nutella into that hole. So my genius of a cousin came up with the idea to use a frosting piper! SO SMART! I have yet to own one of those, but I suggest that if you make these use a piper! If you you do not want to buy one, then you can use a ziplock and cut the corner off and pipe it in! Looking back I wish I would have thought of that earlier!

So as you can kind of see in the photo, there is Nutella in the center of the cupcake as well as incorporated in the frosting. Yes, that is a lot of Nutella, (a WHOLE jar!) but the cupcake recipe calls for a "scant" amount of sugar and no vanilla extract which usually gives chocolate cupcakes their sweetness. So the cake itself is not that sweet. That's where Nutella comes in! Trusty old friend!

As for this cookbook: The Hummingbird Bakery is apparently a London based bakery so the wording is a little different! I actually looked up the word scant! haha! But after trying these, I have to say that the Brits know how to make one bloody delicious cupcake!!


Have a great Labor Day!

Until next time,
Perna Cakes

Wednesday, September 1, 2010

How it all started...The PK Cupcake!


The cupcakes that made me start wanting to really get into cupcakes were actually made from a box! haha! My Aunt was having one of her summer parties for her real estate business "PK Real Estate" and asked me to make cupcakes! I wanted to make them special because my aunt and her business partner are picky/healthy eaters! I knew they loved dark cholcolate so I found a box for dark chocolate cake! The colors of their business are black and pink, so I bought a basic vanilla frosting and used red food coloring to get the right shade of pink! Next I needed a topper! Trader Joes sells these amazing dark chocolate non-pareils (snow caps!) that I knew they loved! I did this as a suprise and it went over really well!


Everyone loved the cupcakes and next thing I knew, my sister was in town and we were brainstorming ideas for a "Perna Cakes" cupcakery!


What do you think of the vintage pin-up style?? I am loving it! I only wish she had brown hair! We can change that!!

Until next time,
Perna Cakes

Cookies and Cream Cupcakes

The cookies and cream cupcake is what I wanted to tackle next! The reason why? Because I love Oreo cookies!! So I went in search for the best recipe and I won't lie to you, I was also searching for a somewhat simple recipe! I am not new to baking or cooking, but doing things from scratch is sort of new! Who doesn't love Duncan Hines or Betty Crocker? They just know how to make it good!

Anyway I found this recipe in another blog called "Annie's Eats"! She has really great stuff on her blog! I am sure I will try a few more recipes from her site! Number one reason I chose this recipe is because of the picture on her blog that showed one of the finished cupcakes cut in half which then showed that inside the cupcakes are real oreo cookie peices and also an oreo cookie half on the bottom of the cake! Much like the picture I took of my finished product:


Here's the recipe:

For the cupcakes:
24 Oreo halves, with cream filling attached
2 1/4 cups all-purpose flour
1 tsp. baking powder
1/2 tsp. salt
8 tbsp. unsalted butter, at room temperature
1 2/3 cup sugar
3 large egg whites, at room temperature
2 tsp. vanilla extract
1 cup milk
20 Oreo cookies, coarsely chopped

For the frosting:
8 oz. cream cheese, at room temperature
6 tbsp. unsalted butter, at room temperature
1 tbsp. vanilla extract
4 cups confectioners’ sugar, sifted
2 tbsp. heavy cream

For garnish:
24 Oreo cookie halves

Directions:
Preheat the oven to 350F. Line the wells of two cupcake pans with 24 paper liners.
Place an Oreo halve in the bottom of each liner, cream side up.
In a medium bowl, combine the flour, baking powder and salt; stir together with a fork to blend and set aside.
In the bowl of an electric mixer, combine the butter and sugar and beat together on medium-high speed until light and fluffy, about 2 minutes.
Blend in the egg whites one at a time, beating well after each addition.
Blend in the vanilla extract.
With the mixer on low speed, beat in half of the dry ingredients just until incorporated.
Add the milk and beat just until combined, then mix in the remaining dry ingredients.
Gently fold in the chopped Oreos with a rubber spatula until evenly incorporated, being careful not to over-mix.

Evenly divide the batter between the prepared cupcake liners.
Bake for 18-20 minutes, rotating the pans halfway through baking, until a toothpick inserted in the center comes out clean.
Allow to cool in the pans 5-10 minutes, then transfer to a wire rack to cool completely.

To make the frosting, combine the cream cheese and butter in the bowl of an electric mixer and beat on medium-high speed until smooth, about 1 minute.
Blend in the vanilla extract. Beat in the confectioners’ sugar until incorporated and smooth, 1-2 minutes.
Add the heavy cream to the bowl and beat on medium-low speed just until incorporated, then increase the speed to medium-high and whip for 4 minutes until light and fluffy, scraping down the sides of the bowl as needed.

Frost the cooled cupcakes as desired. Garnish with Oreo halves.


So I have a couple side notes on this recipe! First off I feel I should tell you that since I do not buy eggs a lot (because I prefer Egg Beaters) I did not have egg whites nor did I want to go buy a carton of eggs just for a few egg whites! So if you have the same sort of problem the solution is easy! They now sell little cartons of "Just Whites"! PERFECT!!! Also, just so you know, when my recipes call for eggs I always use "Egg Beaters" and I have actually found that it makes the cake more moist!!

Also, I bought one bag/box of Oreo's, if you only buy one please note that you will need ALL of those Oreo's! This worked for me because then I could not nibble or have leftovers to eat later, but if you want extra, then by all means buy two!

If you don't want to buy an entire carton of heavy whipping cream (for the frosting) then the easiest solution is to go to your local Starbucks and ask for a short cup of heavy whipping cream! This is 8 oz. which is more than you need, but it is a lot less wasteful than an entire carton going bad in your fridge! The barista's may look at you weird, but if you explain yourself they will understand! It will only cost you about $1.50!! Plus Starbucks has a "Just say yes!" policy! Can I have a short cup of heavy whipping cream? Why yes, you can!!

Finally, this cream cheese frosting is the best you will ever taste! Don't expect to buy from a jar after you have made this simple and delicious frosting!! I can't wait to make some Red Velvet just for this frosting!!

Enjoy!

Peanut Butter Chocolate Cupcakes

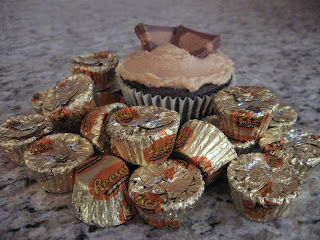
I don't think I can use the name "Reese's" although that is what tops off these delicious cupcakes! I made these for a co-workers birthday after I asked him what his favorite kind of cake was. He said he did not know, so I asked "What's your favorite kind of candy?" to which he replied, "Reese's Peanut Butter Cups!". My response? "Done and DONE!"

I got the basic recipe for milk chocolate cupcakes by searching on google! I know it's pretty simple, but most cake recipes are the same! This one is easy to follow and they taste great! The Peanut Butter Frosting recipe comes from one of my favorite Food Network stars Ina Garten (the Barefoot Contessa). Another easy to follow recipe, but watch out if you have leftover frosting...you won't have it for long! I was eating it by the spoonful!!


Milk Chocolate Cupcakes:

Ingredients:
1 1/3 cups all-purpose flour
1/4 teaspoon baking soda
2 teaspoons baking powder
3/4 cup unsweetened cocoa powder
1/8 teaspoon salt
3 tablespoons butter, softened
1 1/2 cups white sugar
2 eggs
3/4 teaspoon vanilla extract
1 cup milk

Directions
1.Preheat oven to 350 degrees F (175 degrees C). Line a muffin pan with paper or foil liners. Sift together the flour, baking powder, baking soda, cocoa and salt. Set aside.
2.In a large bowl, cream together the butter and sugar until light and fluffy. Add the eggs one at a time, beating well with each addition, then stir in the vanilla. Add the flour mixture alternately with the milk; beat well. Fill the muffin cups 3/4 full.
3.Bake for 15 to 17 minutes in the preheated oven, or until a toothpick inserted into the cake comes out clean. Frost with your favorite frosting when cool.

"Barefoot Contessa's" Peanut Butter Frosting:

1 cup confectioners' sugar
1 cup creamy peanut butter
5 tablespoons unsalted butter, at room temperature
3/4 teaspoon pure vanilla extract
1/4 teaspoon kosher salt
1/3 cup heavy cream

1. Place the confectioners' sugar, peanut butter, butter, vanilla, and salt in a mixing bowl .
2. Mix on medium-low speed until creamy, scraping down the bowl with a rubber spatula as you work.
3. Add the cream and beat on high speed until the mixture is light and smooth.

And don't forget you can top it off with a peanut butter cup or even chopped nuts!

They were a hit with the birthday boy (he ate 7 and brought 2 home) and the rest of the Starbucks crew!! Who are you going to make them for??

Hi!

Hey everyone!

My name is Sarah and I wanted to start this blog to share my love of not only cupcakes, but also cooking! I will post pictures and recipes along with stories of how these experiences went! I have loved to cook since high school, and even wanted to become a chef at one point, but now I have found that it is just something I genuinely enjoy doing in my free time. If I am not writing, reading, or working then I am most certainly in the kitchen! I am currently an English major at Golden West College, but am applying to transfer for Fall 2011 to a number of great schools here in California! Fingers crossed for UCLA! I want to continue as an English major with an emphasis in Creative Writing. If you would like to check out my writing I have another blog called Princess Tree Press! Here's the link: http://princesstreepress.blogspot.com Please check it out!

I also work at Starbucks as a shift lead! It is an interesting job where I get to meet all kinds of people, and since I am a writer I thrive off of intriguing stories! I love my co-workers which is perfect because they have become my taste testers! My cupcakes always go to work with me!

I hope you enjoy this blog as much as I do! And try the recipes, you may be pleasantly suprised!

Until next time,
Perna Cakes